Introduction – What is Meta Transaction App?
The Meta Transaction app is a financial platform designed to help users explore various trading markets, including cryptocurrencies, forex, and other financial instruments. The platform emphasizes secure trading and highlights its aim to make online trading accessible to users. It positions itself as a comprehensive tool for navigating financial markets and it provides a user-friendly experience for traders.
Meta Transaction is owned by Otcpay Inc (Reg. No. 20221348454), licensed under United States MSB (31000212428588). Furthermore, Meta Transaction has also obtained the ASIC (Australian Securities and Investments Commission) regulatory license, registered under OTCPAY PTY LTD (AFS Number 001306248) to strengthen its regulatory capabilities, protect investors’ rights, maintain the stability of the financial system, and promote the development of financial markets. These licenses attest to Meta Transaction’s credibility and compliance level as a financial institution.
We would advise you to read the Meta Transaction risk disclosure before trading Forex, CFD’s, and/or FX Options. Forex, CFD and FX Options trading involves substantial risk of loss and is not suitable for all investors.
Installation & Setup Video Guide
If you’d prefer written instructions, keep reading…
How to download and install the Meta Transaction App
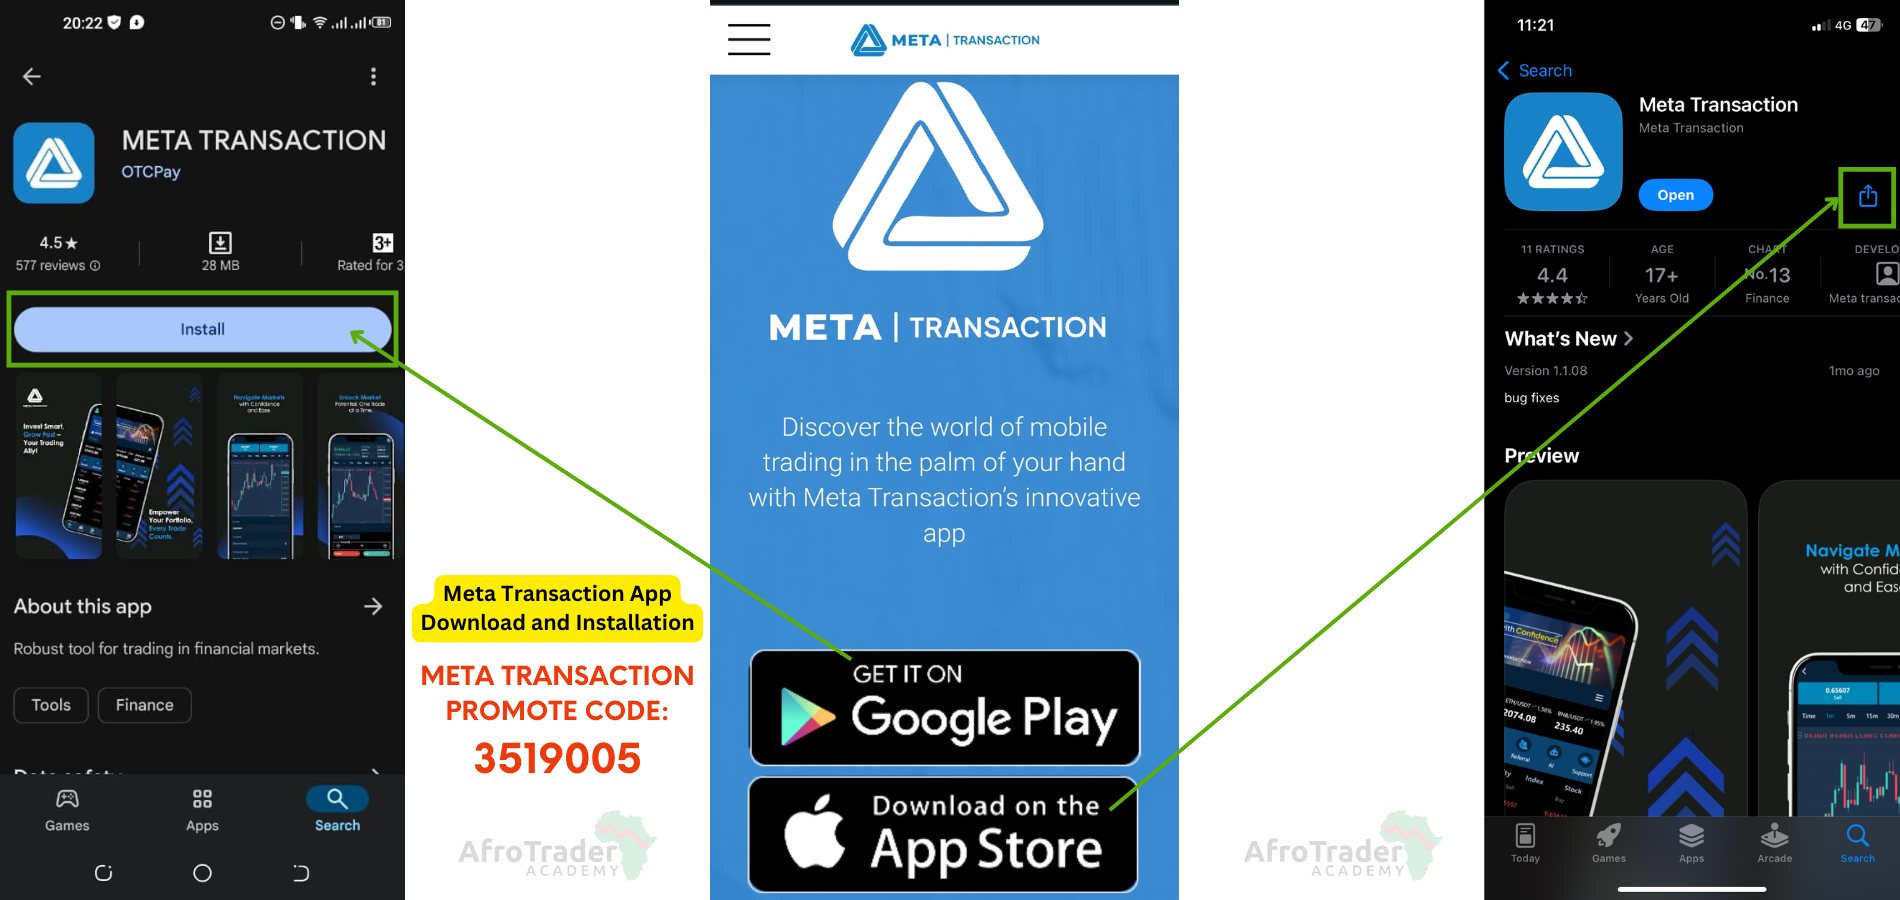
To download the App, you can find it on your Google Play Store or on your Apple App Store as shown in the figure bellow.
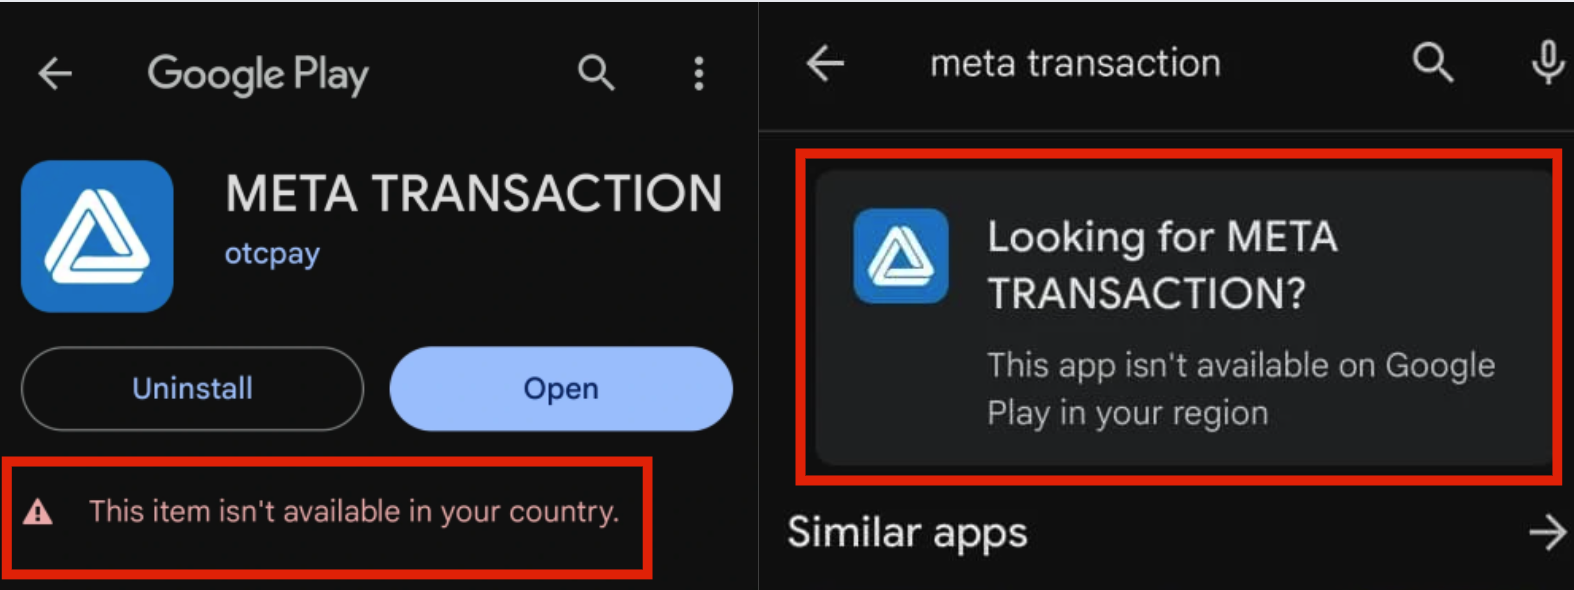
Just so you know, the Meta Transaction App is only available to a few countries worldwide but the good news is that you can still use the app even when you’re in a country that is currently not supported (fore-example if you’re in a country like Nigeria). We will explain below how to fix this.
Download the Meta Transaction App Apk file directly here.
In case you’ve failed to download the app on the google play store or Apple app store, you can download the apk file below. Once installed on your phone, it will auto-update to the latest version.

Download Meta Transaction App
v1.0.98 (28MB)
—–
Simply download the apk file below of the Meta Transaction App and install it on your android phone.
How to register an account on Meta Transaction App
The different ways to create an account with the Meta Transaction app are as explained below;
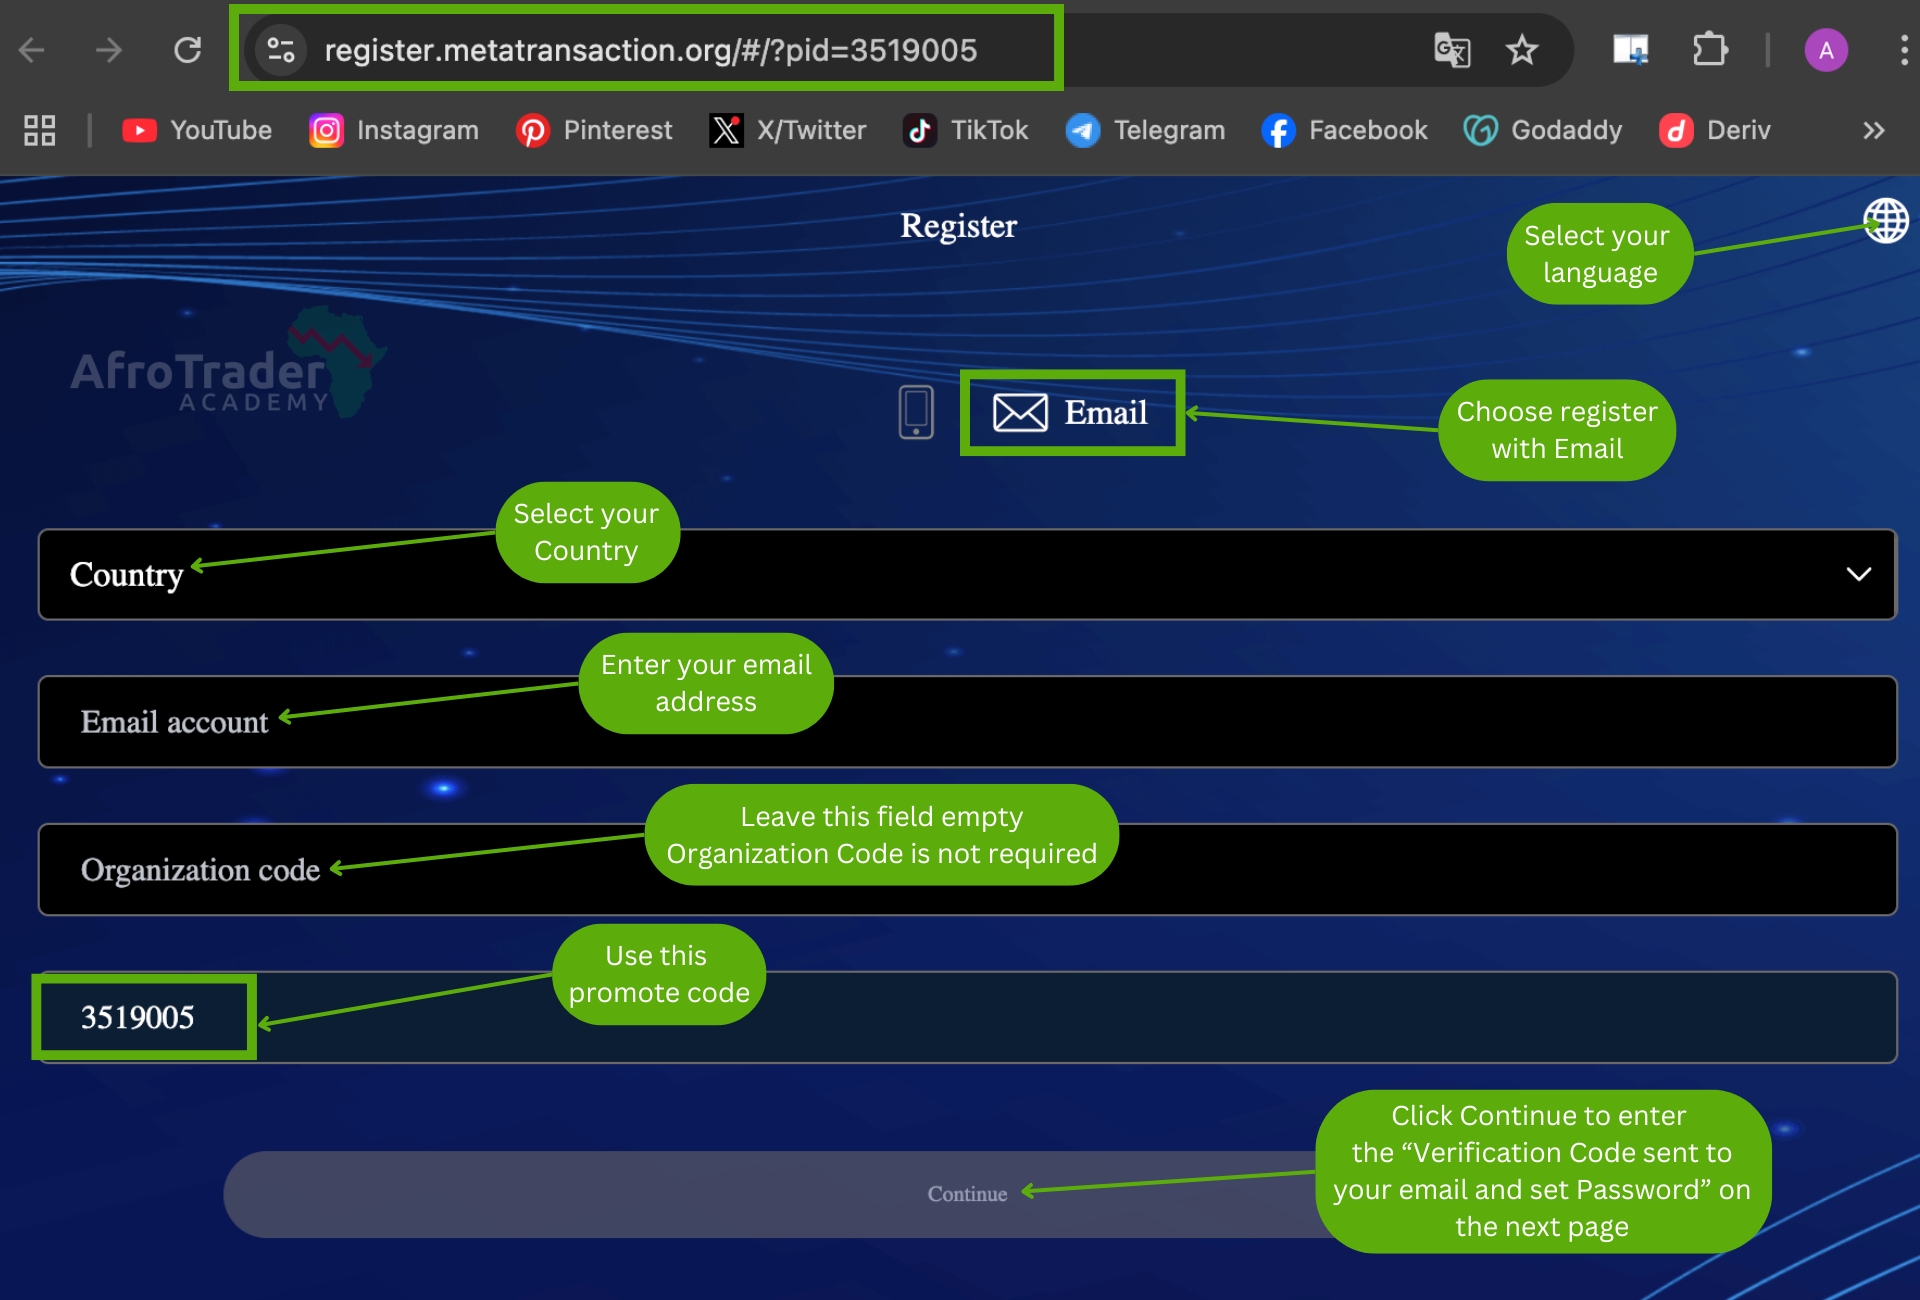
Method 1:- Through the web interface
You can create your account on the Meta Transaction app through the web interface via this link:- https://register.metatransaction.org/#/?pid=3519005
After registering your account via the web interface, you have to login to your account using the mobile app to proceed with the setup.
Method 2:- Through the Mobile App
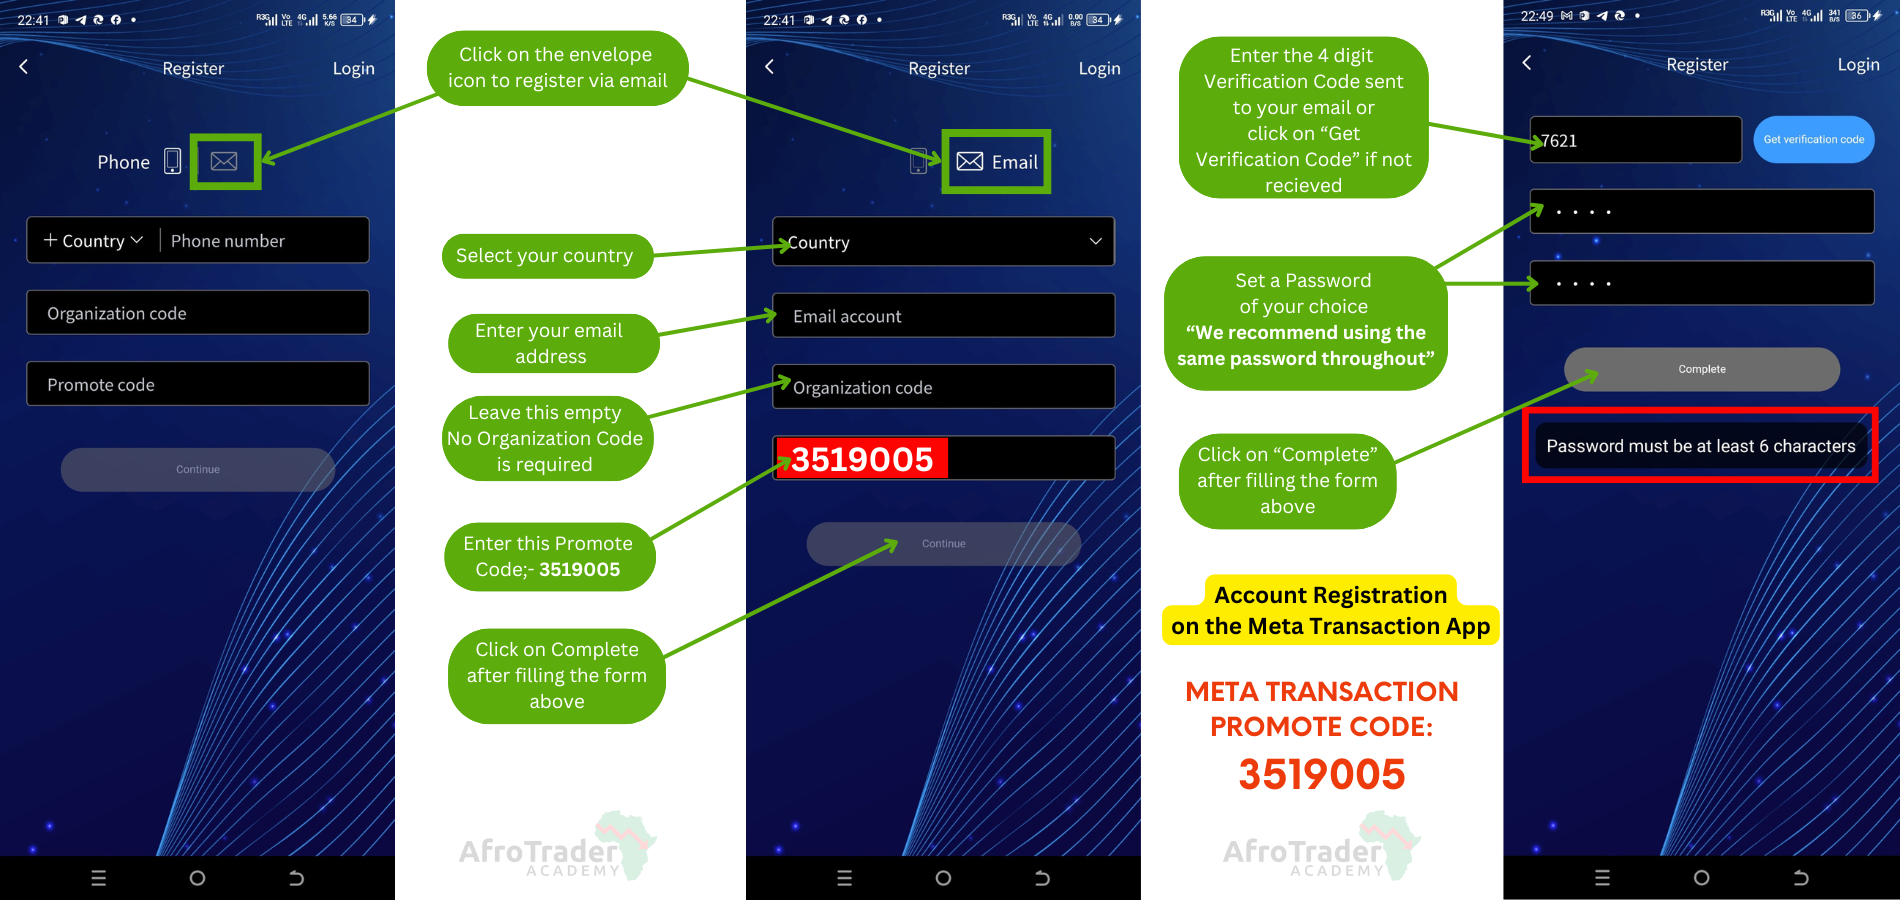
The best recommended way to fully setup the Meta Transaction app is through the mobile app. Follow the steps below to register your account.
- Step-1:- Click on the envelope icon to register via email.
- Step-2:- Select and choose your country (ensure the app is supported in your country, if it’s not, just select Uganda), enter your email address, the organization code is not required – leave this field empty, enter this promote code – 3519005 and then click on complete.
- Step-3:- Enter the 4-digit verification code sent to your email or click on “Get Verification Code” in case you didn’t receive it.
- Step-4:- Set a password of your choice (must be 6 characters or more) – we recommend using the same password throughout.
- Step-5: Click on “Complete” to finish creating your account.
The steps above are as shown in the figure below…
How to do KYC – Know Your Customer
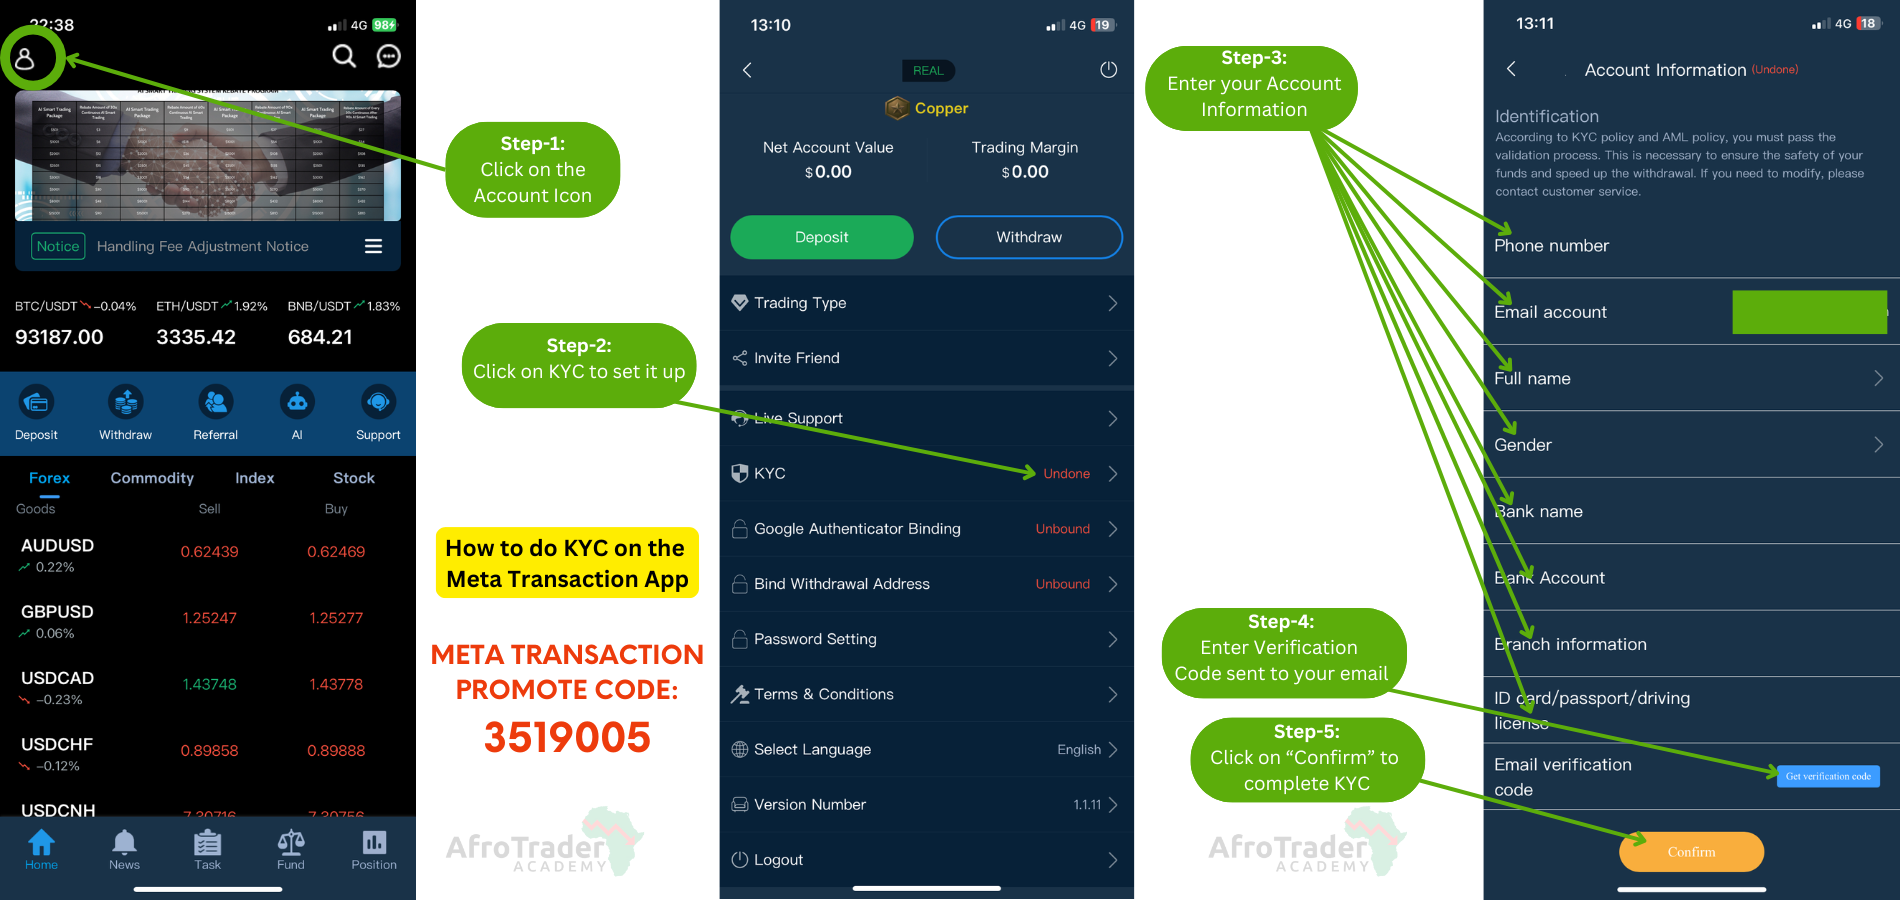
To complete the KYC – (Know Your Customer), follow the steps below;
- Step-1:- Click on the Account Icon.
- Step-2:- Click on the KYC (if it shows Undone) to set it up.
- Step-3:- Fill in your account information i.e. your phone number, email address, full name, gender, bank name, bank account, branch information, ID/Passport number.
- Step-4:- Click on “Get Verification Code” to get your 4-digit code via email, enter your code and click on “Confirm”.
Please note:- If you’re in a country that’s not supported, you can just use these details – Bank Name – “Equity Bank“, Bank Account – “(any 13 digits beginning with 100)“, Branch Information – “Church House“. Assuming that you selected “Uganda” as your country during the account registration.
The steps above are as shown in the figure below…
How to Bind Google Authenticator
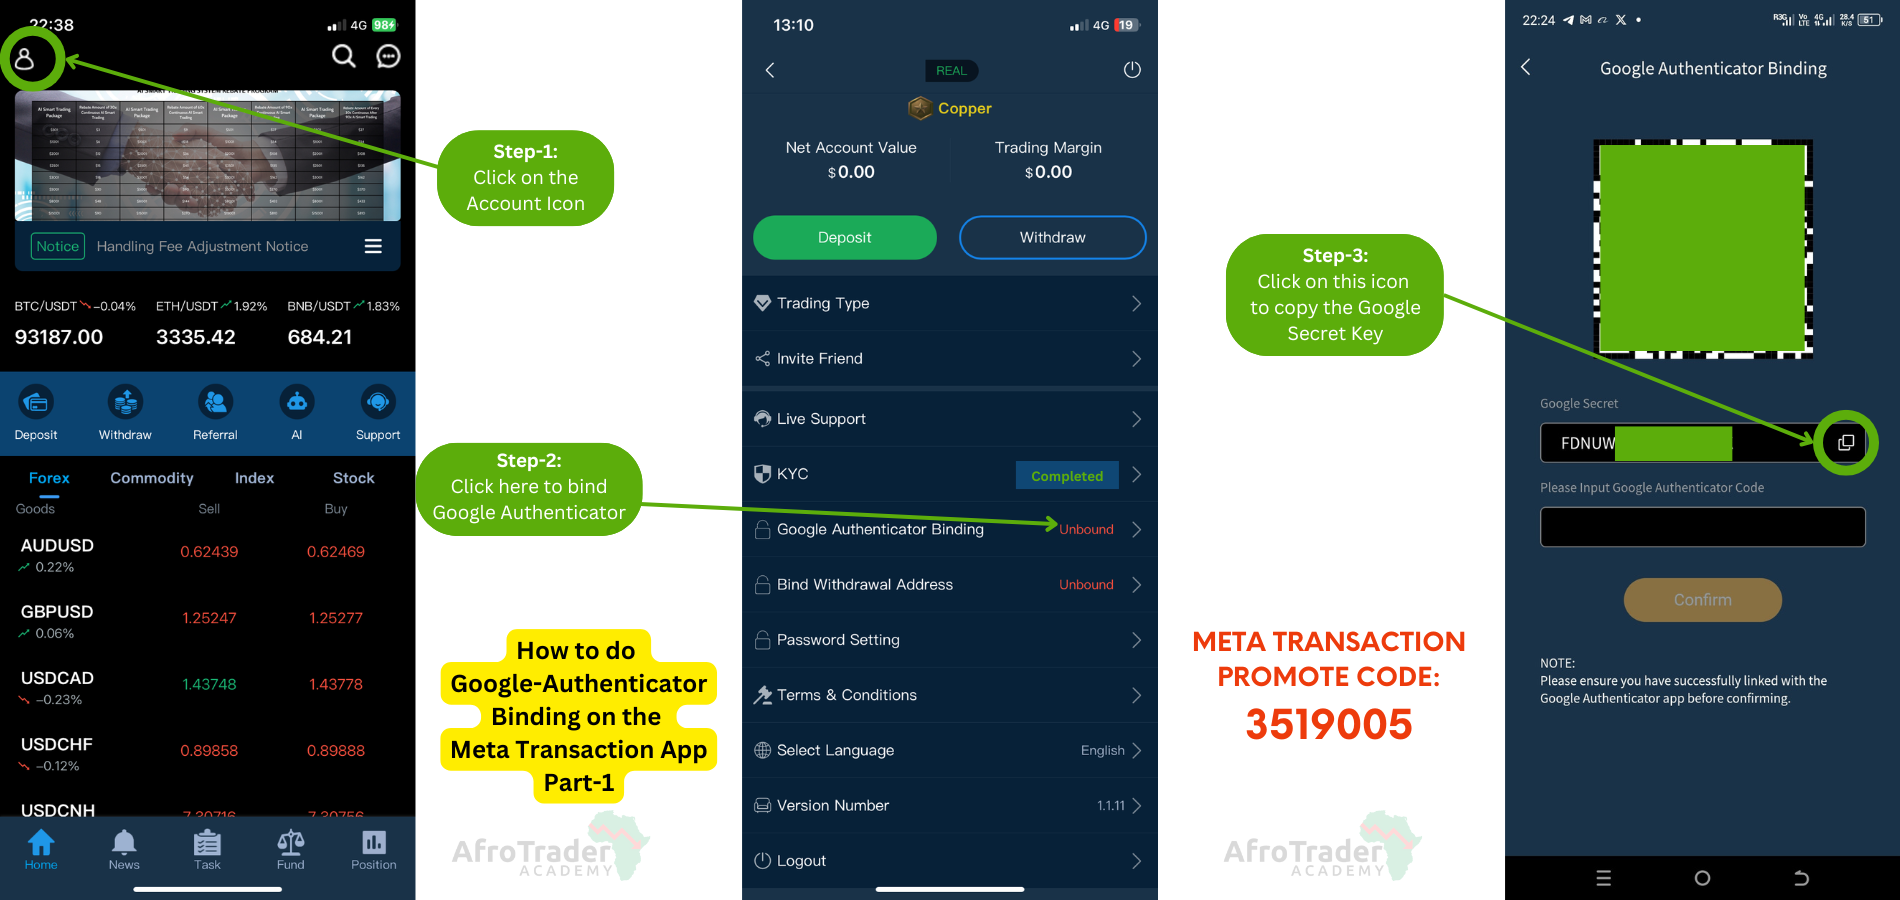
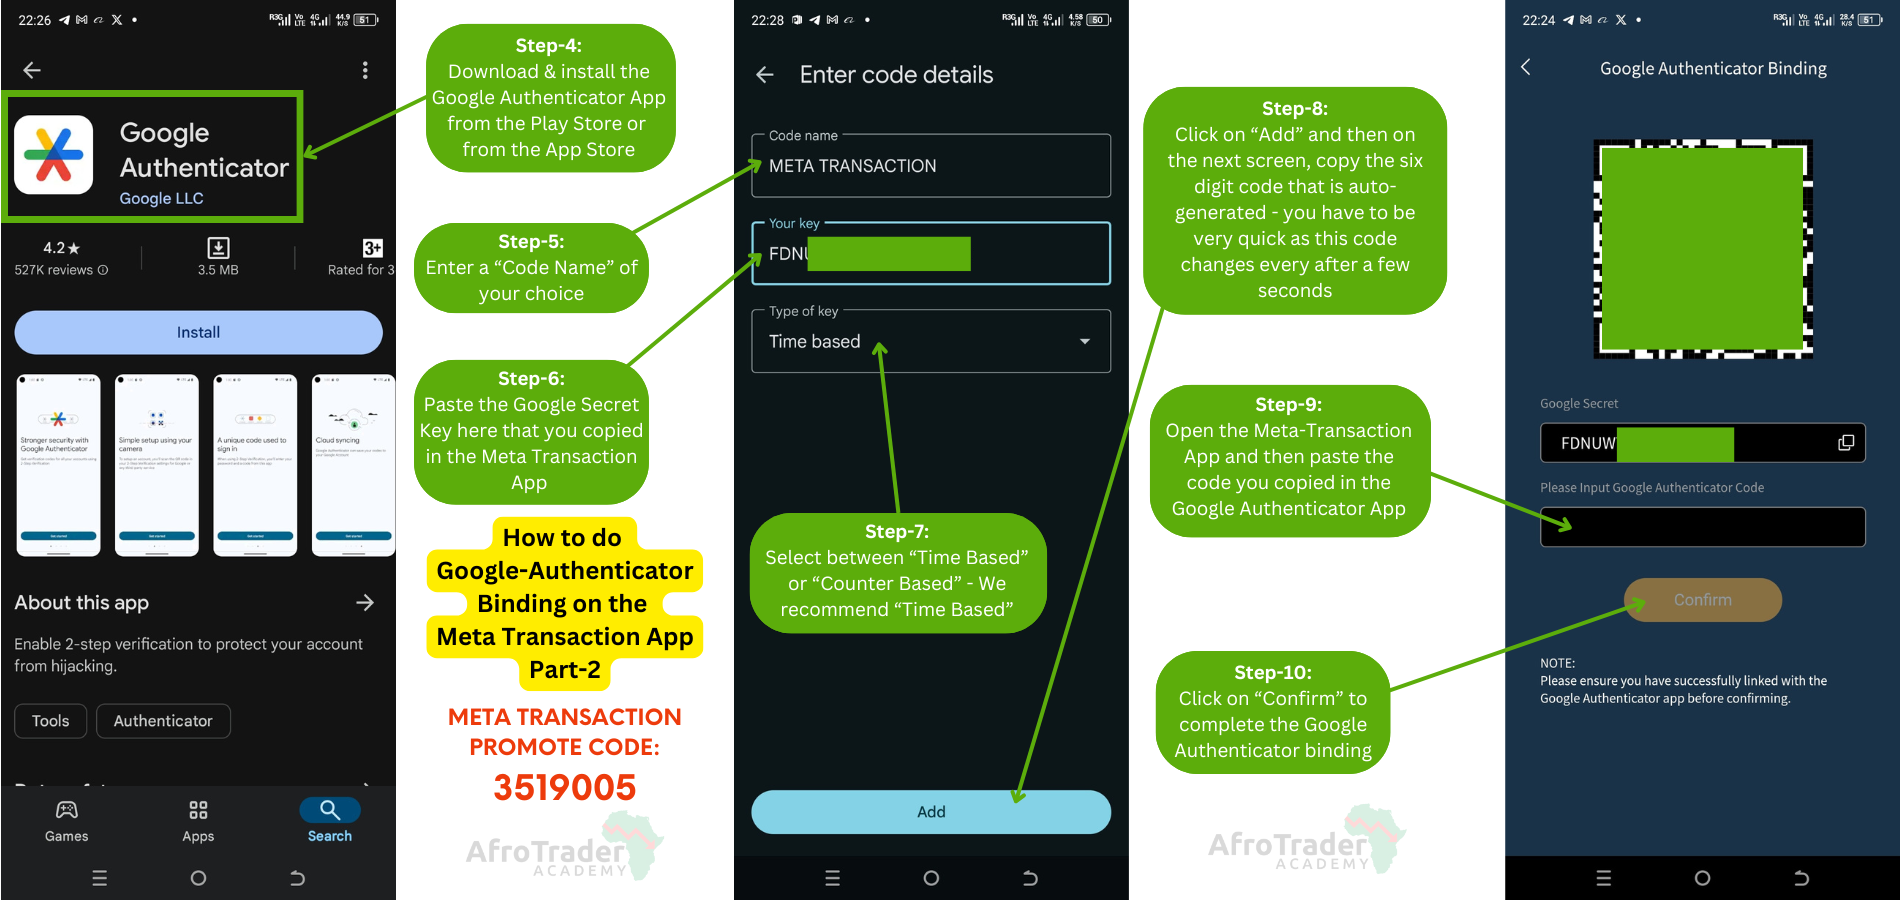
To bind your Google authenticator app with the Meta Transaction app, follow the steps below:-
- Step-1:- Click on the Account icon.
- Step-2:- Click. on the “Google Authenticator Binding” – it it shows “Unbound”.
- Step-3:- On the next page, copy the “Google Secret Key” code or scan the QR-Code. For this tutorial, we shall use the secret code.
The steps above are as shown in the figure below…
- Step-4:- Download and install the Google Authenticator App from the Play Store or from the App Store.
- Step-5:- On the Google Authenticator App, enter a “Code Name” of your choice, let’s say “Meta Transaction” .
- Step-6:- Paste the “Google Secret Key” that you copied in the Meta Transaction App.
- Step-7:- Select between “Time Based” or “Counter Based” – We recommend Time Based.
- Step-8:- Click on “Add” and then on the next screen, copy the “six digit code” that is auto-generated – you have to be very quick as this code changes every after a few seconds.
- Step-9:- Open the Meta-Transaction App, click on “Google Authenticator Binding” and then paste the code you copied in the Google Authenticator App.
- Step-10:- Click on “Confirm” to complete the Google Authenticator Binding.
The steps above are as shown in the figure below…
How to bind your withdrawal wallet address
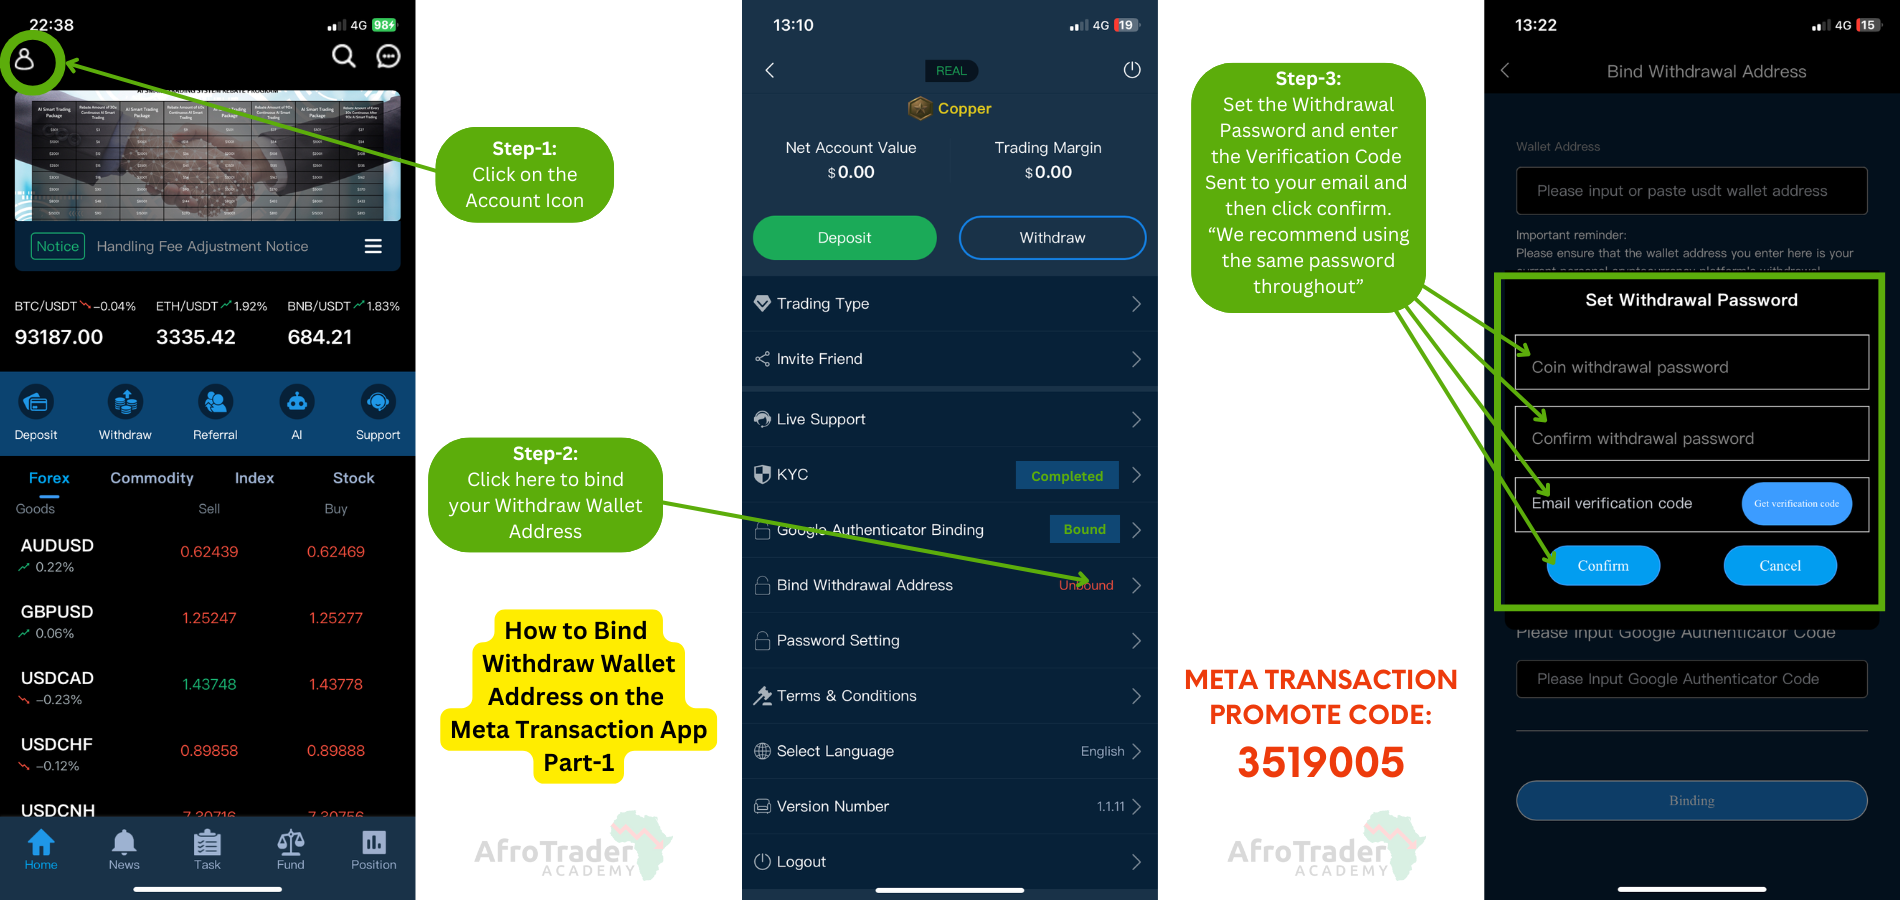
To bind your withdrawal wallet address, follow the steps below;
- Step-1:- Click on the Account icon.
- Step-2:- Click on “Bind Withdrawal Address” – if its Unbound.
- Step-3:- Set the “withdrawal password” – and enter your verification code sent to your email or click to get it and then click on “Confirm“.
The steps above are as shown in the figure below…
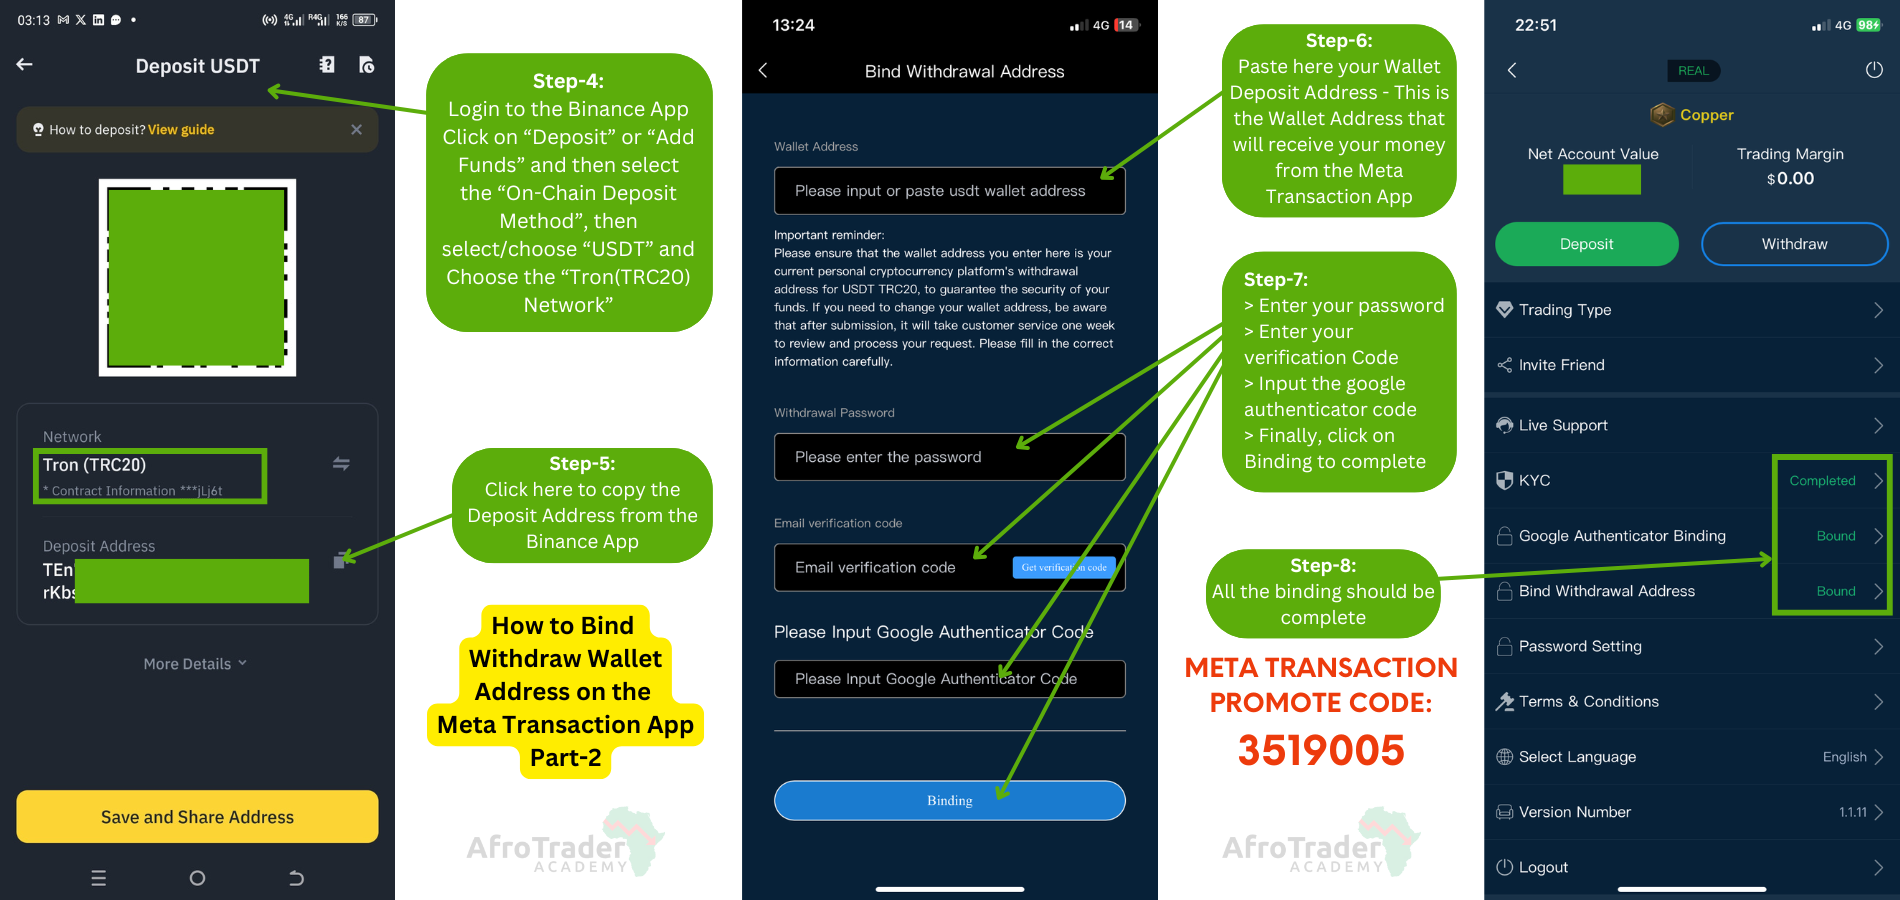
- Step-4:- Login to the Binance App or any exchange you prefer to use – For this tutorial, we will be using Binance. Click on “Deposit” or “Add Funds” and then select the “On-Chain Deposit Method”, then select/choose “USDT” and Choose the “Tron(TRC20) Network”.
- Step-5:- Copy the “Deposit Address” from the Binance App.
- Step-6:- Open the Meta Transaction App and paste your Wallet Deposit Address – This is the Wallet Address that will receive your money from the Meta Transaction App.
- Step-7:- Enter your password, your verification Code, Input the google authenticator code and finally, click on “Binding” to complete.
By now, all the binding should be complete.
The steps above are as shown in the figure below…
How to deposit money on the app from Binance
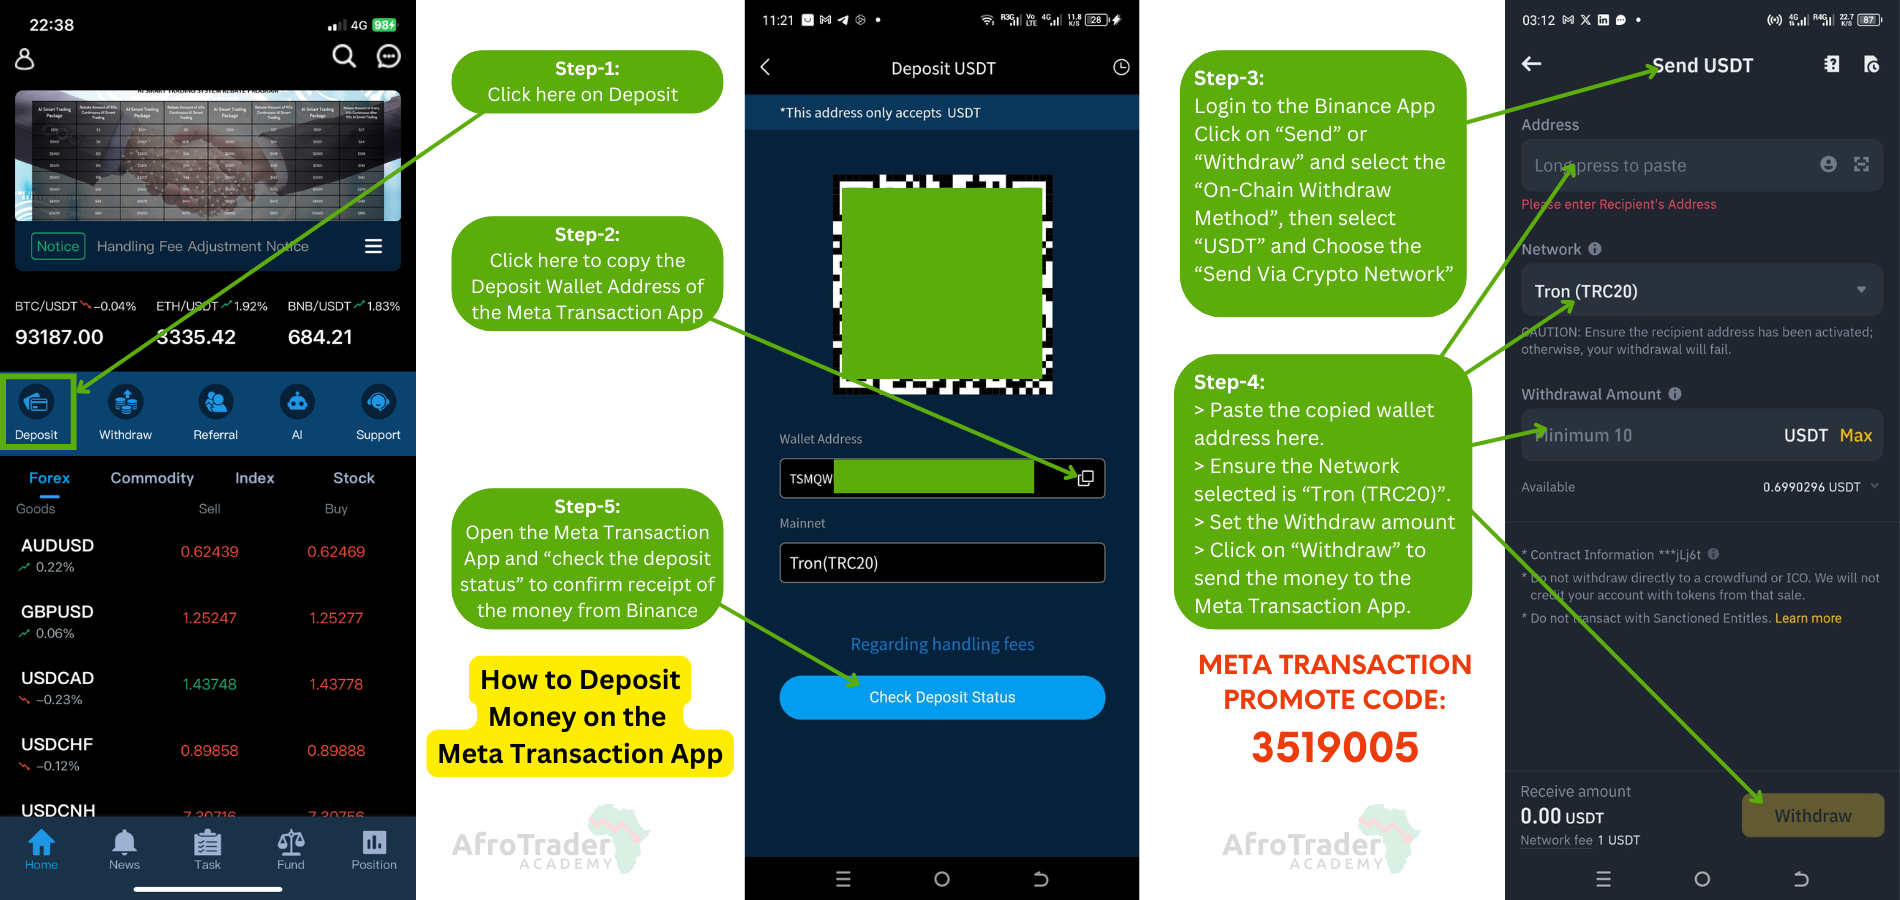
To deposit money on the Meta Transaction App from Binance, follow the steps below;
- Step-1:- Open the Meta Transaction App and click on the “Deposit” icon.
- Step-2:- Copy the Deposit “Wallet Address” of the Meta Transaction App.
- Step-3:- Login to the Binance App and click on “Send” or “Withdraw” and select the “On-Chain Withdraw Method”, then select “USDT” and Choose the “Send Via Crypto Network”.
- Step-4:- Paste the copied wallet address in the ”address” field, ensure the Network selected is “Tron (TRC20)”, set the withdraw amount, and then click on “Withdraw” to send the money to the Meta Transaction App.
The steps above are as shown in the figure below…
How to transfer money from wallet to assets & vice versa
To transfer money from the wallet to assets on the Meta Transaction App, follow the steps below;-
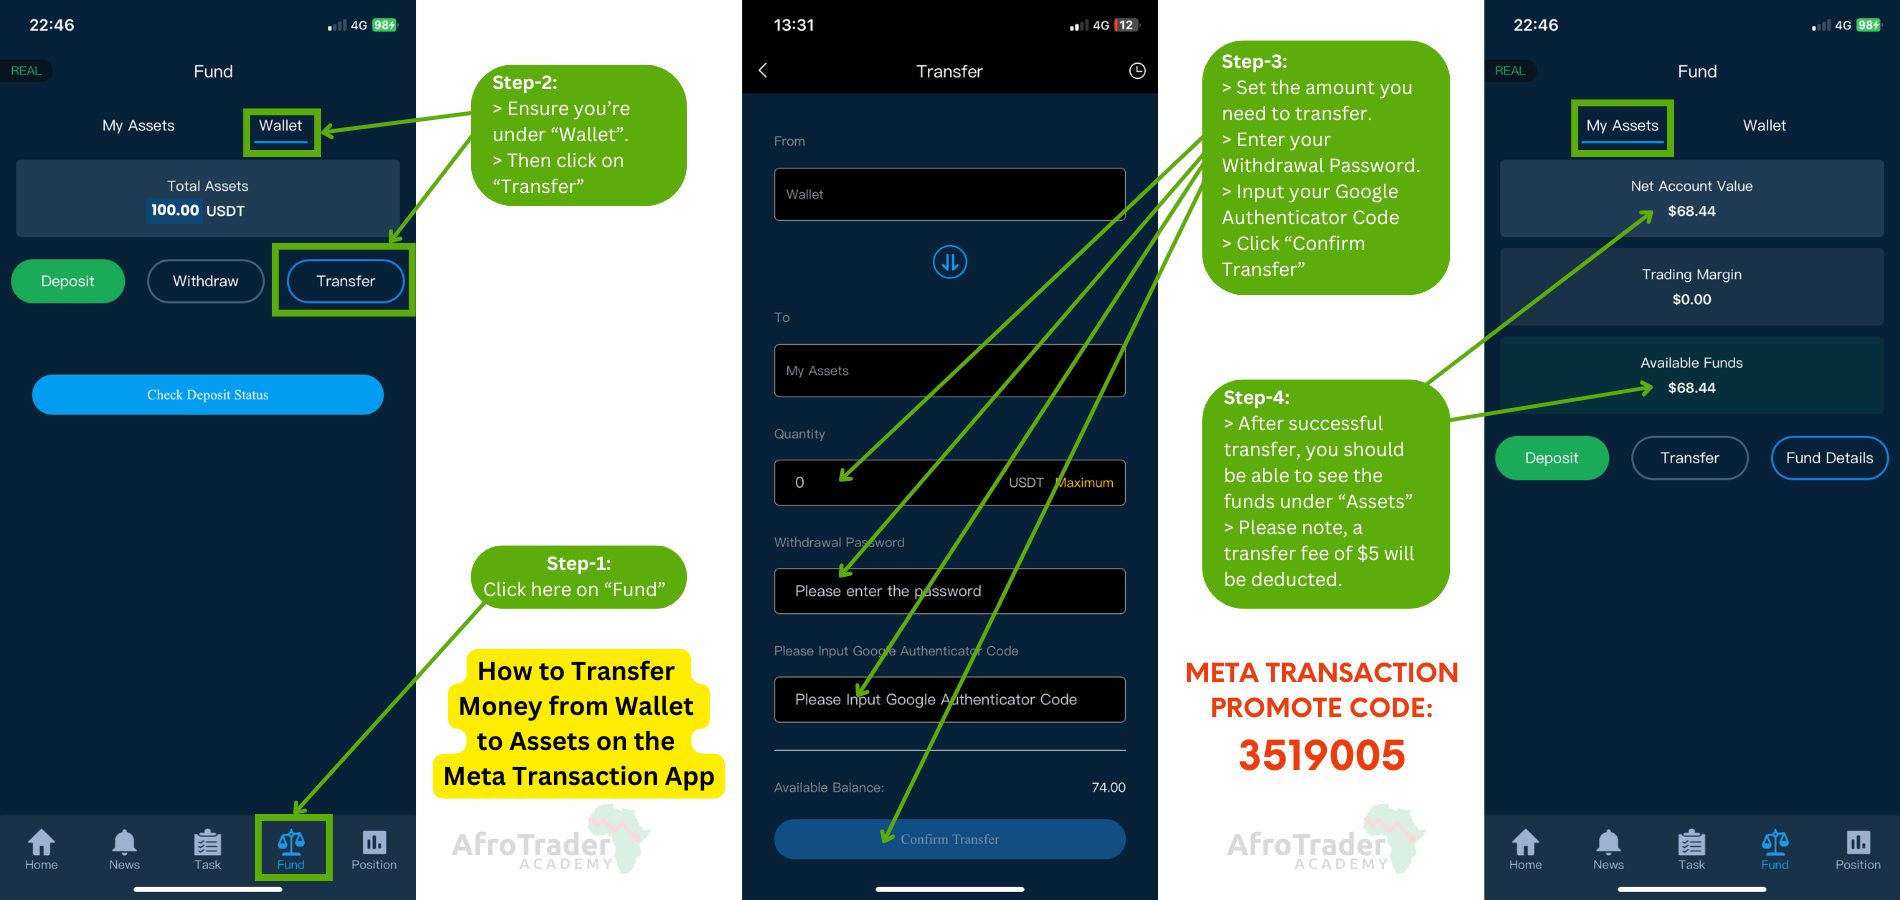
- Step-1:- Open the Meta Transaction App and click on “Fund”.
- Step-2:- Ensure you’re under “Wallet” or simply click on “Wallet” and then click on “Transfer”.
- Step-3:- On the next screen, Set the amount you need to transfer > Enter your Withdrawal Password > Input your Google Authenticator Code and then > Click “Confirm Transfer”.
- Step-4:- After successful transfer, you should be able to see the funds under “Assets”.
- Step-5:- To transfer your money from “Assets” to “Wallet”, while under “Assets”, just click on “Transfer” and then click “confirm” to move your money from Assets to the Wallet (Ensure the AI Smart Trading Feature is turned off).
The steps above are as shown in the figure below…
Here are a few things you need to know about making transfers within the Meta Transaction App:
- Internal transfer from Wallet to My Assets from $83 and below costs a charge of $5.
- Internal transfer from Wallet to My Assets from $84 and above costs a charge of 6% of the amount transferred.
- Internal transfer from My Assets to Wallet from $100 and below costs a charge of $5.
- Internal transfer from My Assets to Wallet from $101 and above costs a charge of 5% of the amount transferred.
- Internal transfer from Referral Commissions to My Assets has no charges.
- Minimum amount to transfer between My Assets to Wallet and Vice Versa is $25.
How to trade with the “AI Smart Trading” feature
To trade with the AI Smart Trading Feature, follow the steps below;-
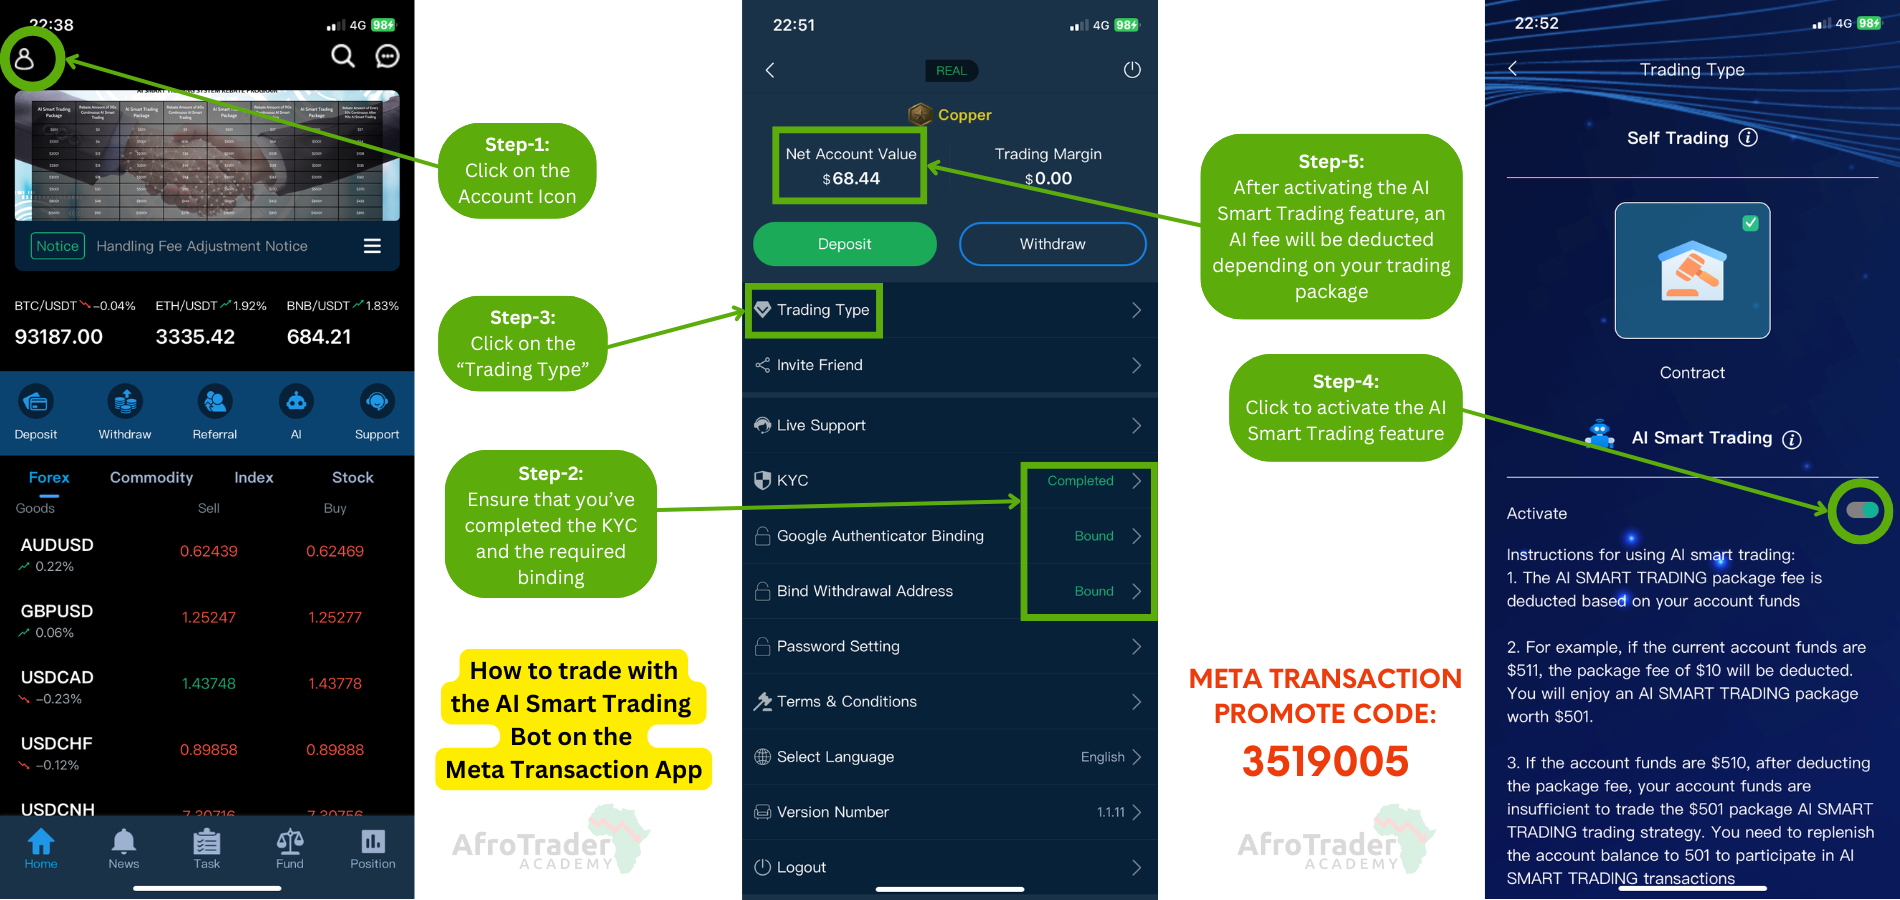
- Step-1:- Open the Meta Transaction App and click on the “Account Icon“.
- Step-2:- Ensure that you’ve completed the KYC and the required binding.
- Step-3:- Then click on the “Trading Type“.
- Step-4:- Click the toggle switch to activate the AI Smart Trading feature.
- Step-5:- After activating the AI Smart Trading feature, an AI fee will be deducted from your “Net Account Value” depending on your trading package.
The steps above are as shown in the figure below…
How to withdraw money from the app to your wallet address
To withdraw money from the Meta Transaction App to your wallet address, follow the steps below;-
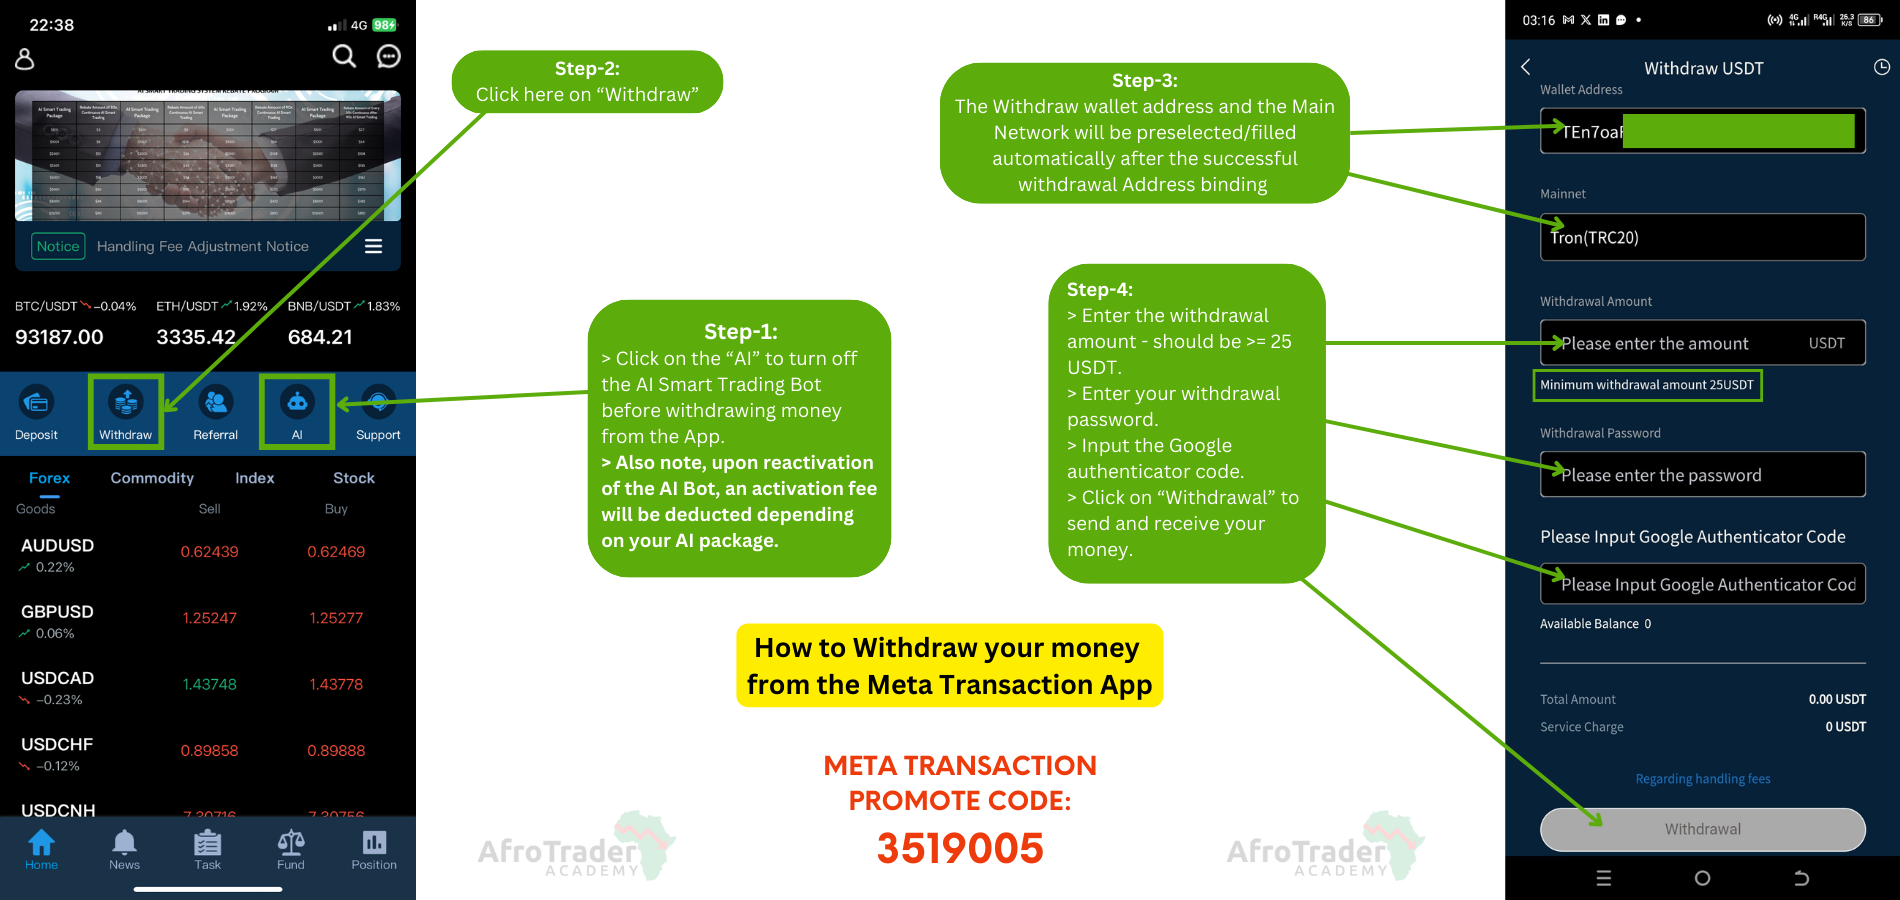
- Step-1:-Open the Meta Transaction App and click on the “AI” icon to turn off the AI Smart Trading Bot before withdrawing money from the App. Also note, upon reactivation of the AI Bot, an activation fee will be deducted depending on your AI package..
- Step-2:- Ensure that you’ve already moved the money from “Assets” to “Wallet” and then click on the “Withdraw” icon.
- Step-3:- The Withdraw wallet address and the Main Network will be preselected/filled automatically after the successful withdrawal Address binding.
- Step-4:- Enter the withdrawal amount – (25 USDT is the minimum amount) > Enter your withdrawal password > Input the Google authenticator code, and then > Click on “Withdrawal” to send and receive your money.
Here are a few things you need to know about making withdrawals from the Meta Transaction App:
- You can withdraw both capital and profit anytime you wish.
- Withdrawals from Wallet to your external exchange takes around 2-3 minutes.
- Withdrawals from Wallet to your external exchange has no charges.
- Minimum amount to withdraw from Wallet to external exchange is $25 or 25 USDT.
- Withdrawals from Assets to Wallet takes around 1-2 business days but in most cases, it’s done with in less than a day.
- You can withdraw your money anytime you wish on working days from Monday to Friday but we’d recommend making your withdrawals between Monday and Thursday morning.
AI smart trading package fees and profit structure
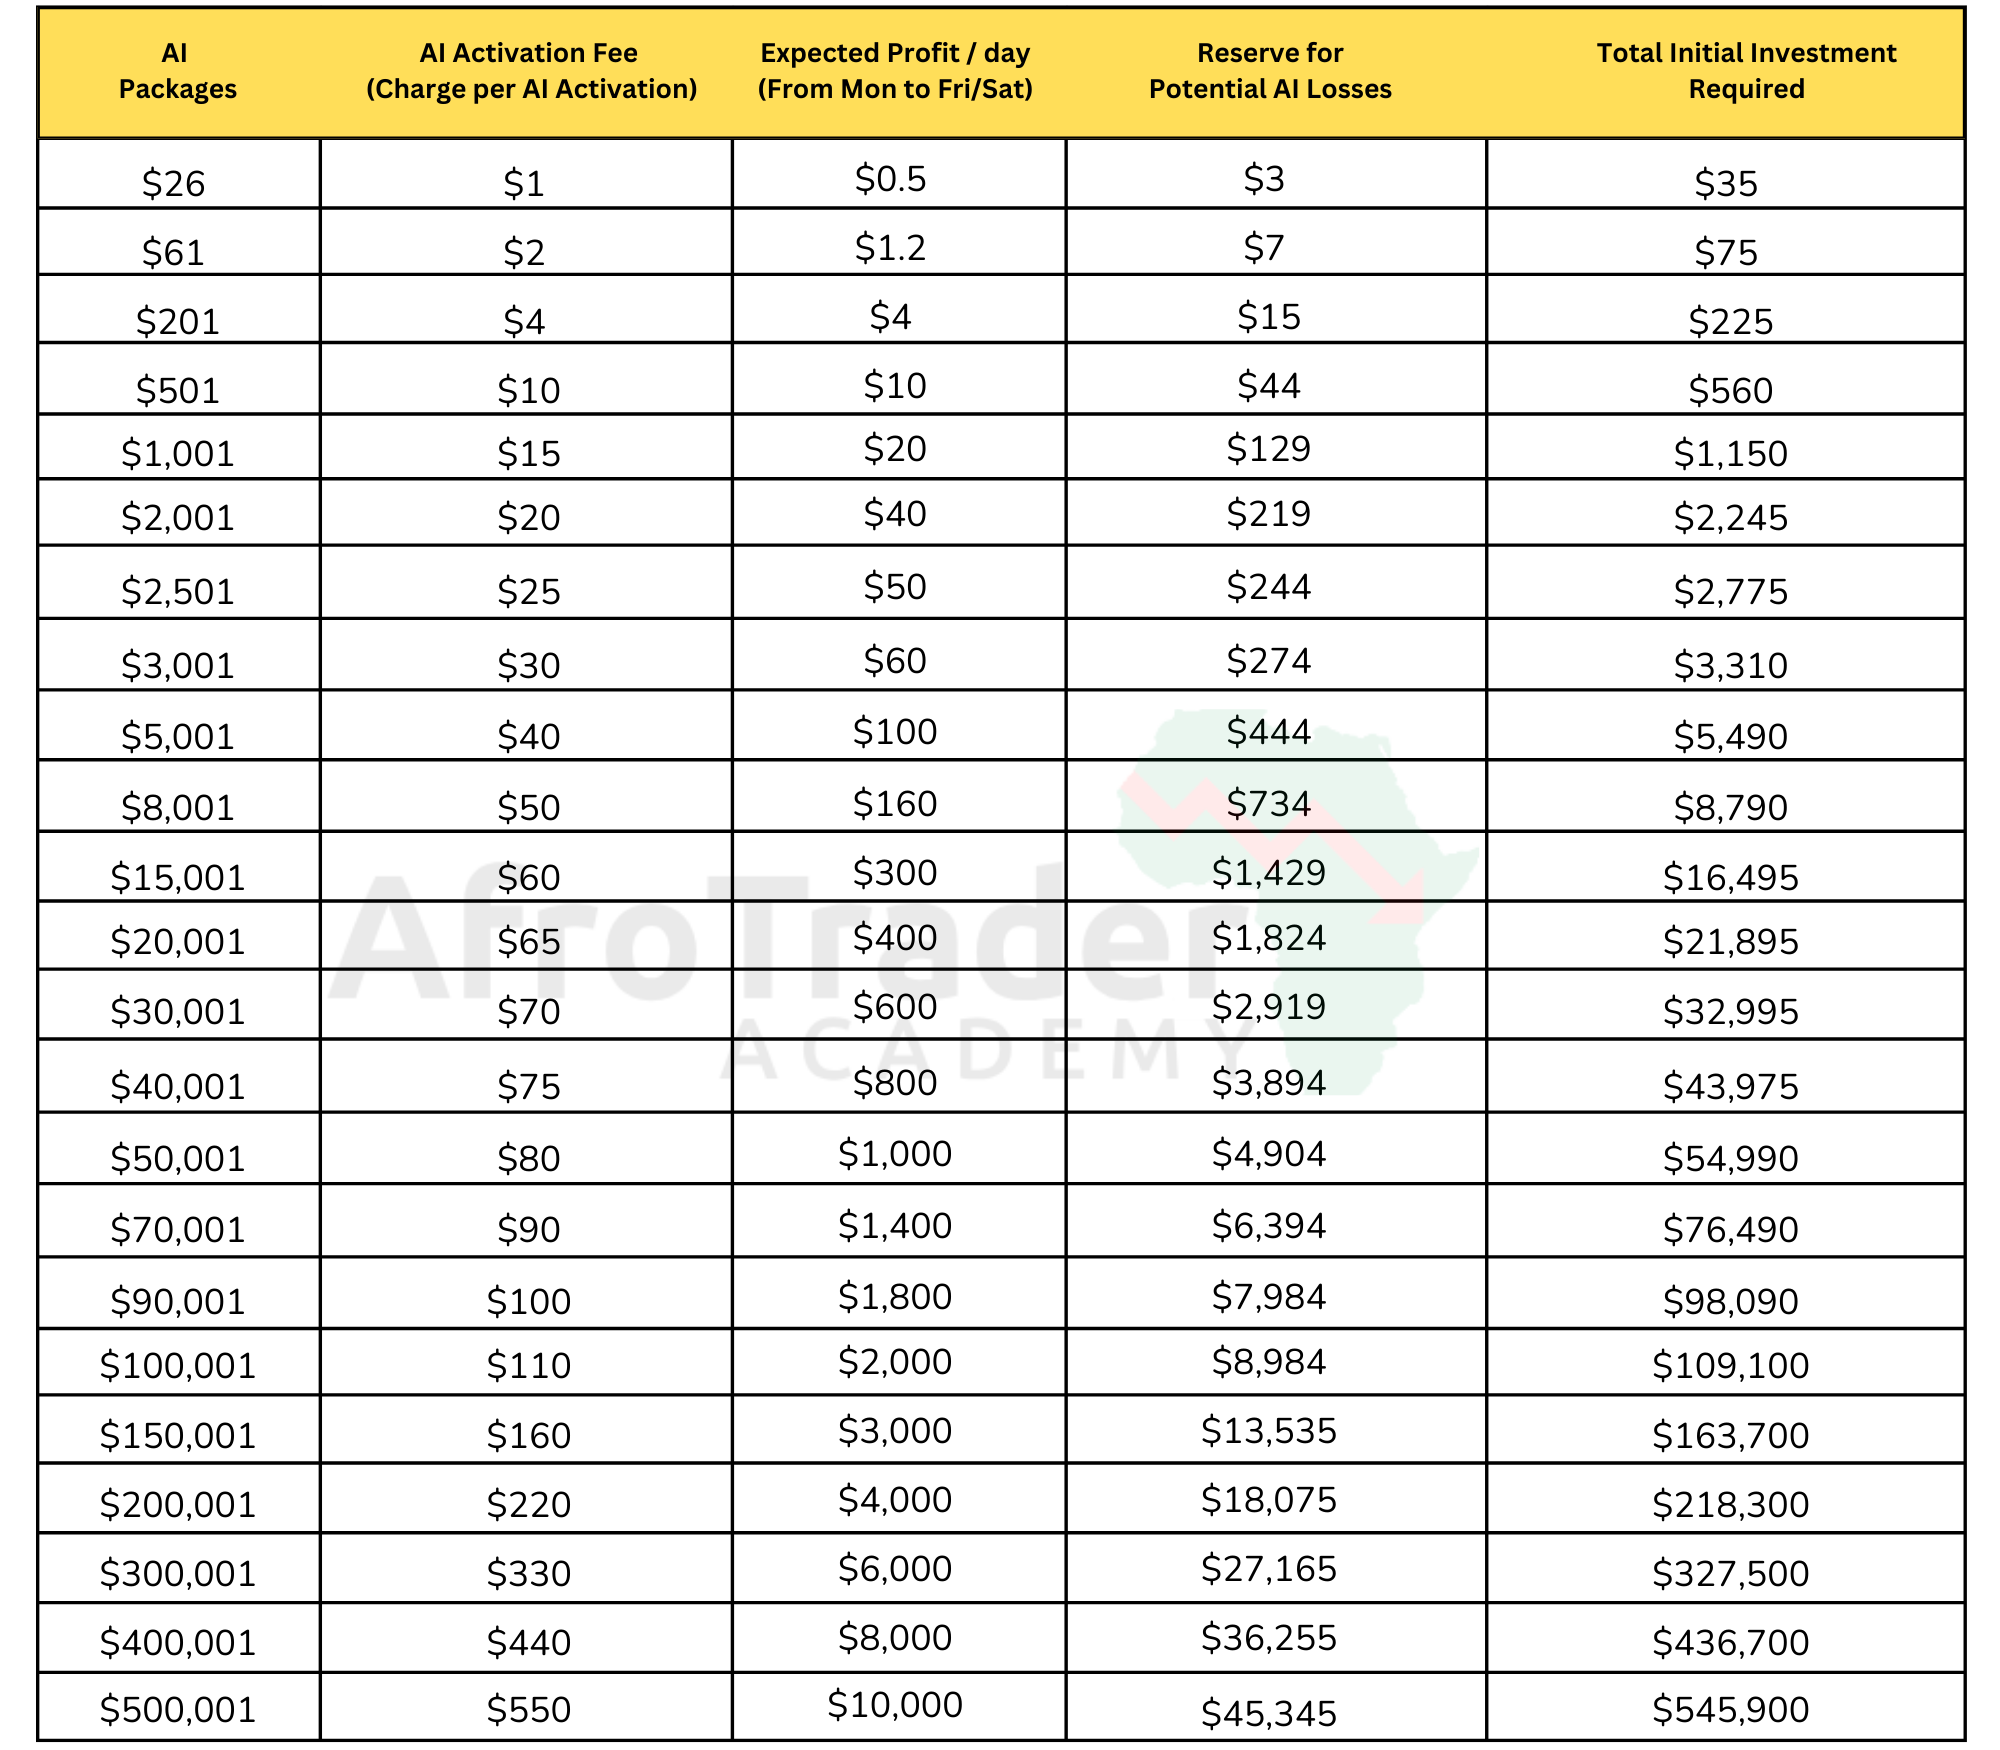
The table below shows the following:-
- The different AI Packages that are supported by the AI Smart Trading bot.
- The AI Activation Fee – This is the charge that is deducted from your “Net Account Value” on every AI Smart Trading Bot activation. This fee varies depending on the AI package.
- The Expected Profit per day – This is the amount of money you expect the AI bot to make for you on every single day from Monday to Friday / Saturday depending on the AI package – Please note:- the figures here under profit are not constant, they will fluctuate.
- The Reserve for Potential AI Losses – This is the money that is anticipated to be lost within a period of a month. – Please note:- the figures here under losses are not constant, they will fluctuate – these are estimates.
- The Total Initial Investment Required – This is the total sum of the AI Package + Transfer fee + AI Activation Fee + Reserve for Potential AI Loss – This is the total amount you should load on the app to start trading – depending on the chosen AI package.
